Well, unfortunately I had little time for building this week. I instead spent the week working overtime because we are short handed at the moment. I did get to start a few pieces, but as of yet have nothing completed. I am hoping to finish and maybe get a couple more pieces built this week. So lets see what I've got so far...
Things you will need:
- Hard boards bases that you cut and sanded last week.
- Foam insulation board.
- Wire foam cutter.
- Glue, sand and painting supplies.
- Cake topper plastic pillars. (Purchase these at any party supply store for cheap)
- GW Manufactorum kit.
- GW modular Warhammer Fantasy movement trays.
So the first piece I built this week was simply more foam squares, cut and sanded to build a wall. I chose one of the smaller hard board bases and built the corner of a ruined building. Very simplistic, but adds some great low level LOS blocking. Plus it looks really cool and is very fast to build. If you don't remember how I made the foam blocks, I cut out small squares and sanded the edges down to make them look worn. I then glued them together with white glue. Easy... Now that I added sand to the base, I just have to get it painted.
 |
| Ruined wall section made from foam. |
The next piece I decided to get a little creative. I still used the same foam blocks, but I added in a broken pillar. I had a couple pillars that go on cakes which you can purchase at any party supply store for a few dollars. My pillars were approximately 6" in height. I took a small saw and cut the decorative top and bottom off first. I then chose a random spot and angle to cut the pillar in half. The trickiest part of this was that the pillar is hollow. I took some scrap foam and shoved it into the ends then took my wire foam cutter and cut the foam smooth. Glue the pillars down with some super glue and go to town with the blocks and sand. You should end up with something like this...
 |
| Broken pillar and ruined wall section. |
So my final piece I started was actually a building. For this I have used two of the GW manufactorum sprues and a section of the modular movement trays (for tile flooring). I don't think I am finish with it quite yet, I feel it is slim on the one side. I will probably add a few low walls to the empty corner. I originally planned to build these as if they were partially buried, but as I have said before, often simple is best when it comes to scenery. I still might try out a building in the end, but I want to get a couple buildings knocked out and playable before I venture into the unknown. If you haven't tried these GW buildings then you should get some. They go together quite well and look great when you get them painted. There are tons of details that you can pick out, but they also look great with basic dry-brushing. I built a simple two story blown out building but didn't want just sand floors. I saw in this month's White Dwarf Magazine where one of their guys used the modular movement trays to make a tile floor on a Tomb King temple. I thought it looked great and I happened to have some extras laying around. I broke off jagged pieces to breakup the square outline of the tray and then used those pieces as filler. I think it turned out great and plan on using more. Enough for now, I can babble some more when I actually finish the piece and get another one done. Here's some pictures of what it looks like so far...
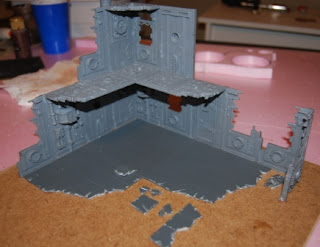 |
| A shot of the flooring. Will look better when it has paint on it! |
 |
| The front of the building... pretty plain for now. |
So that's what I got this week. I hope your tables are coming along well. If anyone is building a table, I would love to see some pictures! Hopefully I can get my pieces painted and another building done too! Until next time.


Maybe we can use some this new terrain tonight when my Wolves take on your Necrons......
ReplyDelete