Sorry for the long break, my Inquisitorial duties forced me to travel to a hell stricken planet and banish demons. (i.e. sit on the beach and get a tan.) But I am back with renewed energy and I ramped up my terrain making this week. This time around I am making some natural terrain; hills and rocks. These might seem pretty easy, but I have always found that simple is best when building scenery. Let's have a look at what I used this week...
- 2x4 sheet of hard board. (should be left over from the original sheet)
- Foam insulation board. ( I have 1-1/2" pink insulation board)
- Jig saw (or something similar to cut odd shapes in the hard board)
- Palm sander (or something to sand the board edges, by hand will take forever)
- Wire foam cutter (battery operated ones can be bought for less than $10)
- Painting supplies (brushes, paints, etc...)
- Sand and glue (same used on the table)
- Fine sandpaper (I use this to sand the foam)
 |
| 1-1/2" foam insulation board |
 |
| Some of my tools. |
 |
| Hardboard after I cut and sanded the edges. |
The first thing I did was to cut out my hardboard bases, as you can see above. I cut some random shapes and rounded the edges off. I then cut out some square pieces for buildings. Once all the cuts were done I sanded down the edges with the palm sander. A tip here is to sand both sides of the board around the edges.
Next I went to making the foam hills and rocks. You'll need your wire cutter and your foam. You can create any shaped hill that you want, but I always slope the edges slightly. I created four hills, two large and two small that can stack on top of the other two.
 |
| Two of the large hills. |
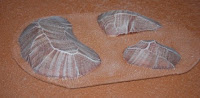
Next I moved onto the rocks. These I simply cut out squares of various sizes and the slowly chopped them done to look like rocks, leaving one side flat to glue to the hardboard bases. Once your happy with the look and size, you can glue the rocks to the board. Tips here are to score the bottom of the foam with a knife to help the glue adhere and also be sure to leave enough room to move miniatures around the rocks. They should look something like this...
 |
| Rock formations approx. 10"x6" |
I left the rocks to glue over night and went back to my hills. I actually use a fine grain sandpaper to sand the foam. This takes the sharp edges off and helps the glues adhere to the foam. This doesn't have to be perfect, the glue will work even if you miss some spots. I went to work applying glue with a brush, make sure you add a little water to the glue. Then cover with sand and let dry over night. I did the same to the hardboard on the rock formations. You could cover the rocks, but I really like the sharp edges and the way the dry-brushing looks without it.
 |
| After sand, left to dry. |
 |
| Base coated, left to dry. |
|
Next it was off to get my paint supplies. I base coated the sand with my table color and then base coated the rocks in a dark brown acrylic from Wal-mart. You can make the rocks what ever color you want to match your table, you can do a black base and then highlight with a dark gray and light gray. This would work on any table. I chose to go with dark brown, Bubonic Brown and then Bleached Bone. This matches more with my desert scheme. Make sure your house paint is dry before you go on to dry-brushing, that really messes things up if not. Once your final highlights are on, your done! Hooray, they are ready for gaming.
I had a little extra time and had some foam skulls left over from Halloween. A great time to go shopping for terrain stuff is right after Halloween and after Christmas. You can pick up some great stuff for really cheap!
I used two skulls to make what looked like ruined carved stone skulls. I put one inside a sand dune and used a small saw to cut one off at an angle to make the appearance that it was half buried. I also added small foam squares that I sanded down to make a ruined wall section. I simply based these the same as the rocks and went to town painting. I think they turned out pretty well. I might add some more of this style.
 |
| Skull with ruined wall. |
 |
| Skull in a sand dune. |
Once these are done, you have enough to play a game. Not a lot of variety, but hey your rolling dice and stuff's dying! Next week, I am going to move on to man-made structures. Should be interesting, I would like to make them look half buried under sand. I'll have to think about this one a little. Hope you enjoyed and that this helped. Some more photos...
Thanks for reading!


Loving the skulls :P
ReplyDeleteThanks! They turned out pretty good for $.99. The only thing I did was dry brush them.
ReplyDelete